Tuesday, March 7, 2017

Report Writing and ChatterPix


Look at these great illustrations from our penguin research project! Students selected one of the 17 different kinds of penguins to research and used non-fiction books, a student subscription to WorldBook Online, the Web site KidZone Penguins, and the kid-friendly search engine KidRex to research their penguin.

Students learned about their penguins location in the world, their size, diet, habitat, predators, and an interesting fact. Students checked in with me to make sure their research information was accurate before proceeding to the next step.

Students then used their knowledge about their penguin to draw a full color picture of their penguin and their habitat using crayons as this medium shows up really well in ChatterPix.

Using their iPads and the App ChatterPix, students took a picture of their penguin drawing. Then students drew a line for a mouth on their penguin picture and recorded their voice "speaking" as the penguin.

Finally, we did some "App Smashing." We uploaded our Penguin ChatterPix videos to SeeSaw and shared them to our class blog. We also printed out a paper copy of our research reports from SeeSaw and hung them on the bulletin board in the hallway so other students could scan the QR code reader and learn from our research. Finally, we uploaded our penguin research projects to Padlet so we can share them with parents, our school community, and you.

Click on this link to listen to our penguin research projects https://padlet.com/rafterys/penguin Enjoy!


Tuesday, January 10, 2017

Formative Assessment and Classkick


Happy New Year friends! I'm so glad to get back to blogging. While I've been away, I have been learning about some of the best Apps for teachers. Right before Winter Break, I started using a formative assessment App called Classkick with my primary students and it's one of my new FAVORITE things. Are you using it in your classroom? If not, you should give it a try.

Classkick can be downloaded for free from the Apple App Store. Chromebook, laptop, or desktop users can access Classkick from classkick.com. Before I downloaded the App (my district requires iPad Apps to be approved and it takes a few days), I made QR codes that directed students to their Classkick assignment.

Classkick is very teacher friendly and their Web site has tons of tutorials and get started guides for every grade level. I watched a few tutorials and uploaded my first assignment in under an hour.

Students can work at their own pace and receive immediate teacher feedback by virtually raising their hand. Students can click on the hand icon when they need help or are ready to turn in their assignment. In my class, students know to be on the lookout for teacher feedback on their Classkick assignment before moving on to the next activity. I've also set the expectation that students need to go back and fix incorrect answers. After students fix their mistakes, I can drag "old" feedback that is no longer needed to the trash can to delete it. I enjoy the ability to "pass" the paperless assignment back-and-forth without exchanging any paper.

Teachers have the ability to upload any PDF assignments to Classkick. As a primary teacher, I have hundreds of paper assignments in my filing cabinets. I also have tons of Word and PowerPoint files (yes, I create/design my Add Some Sparkle materials in PPT) that can be saved easily as PDF files. I like the fact that I don't have to create a separate multiple choice, short answer, or true/false assignment in order to use Classkick as a formative assessment tool. I'm all for working smarter, not harder.

Teachers have the ability to record their voice on assignments. Instead of typing out a bunch of written directions, I simplified my teacher directions and recorded a short audio segment with the steps students should follow to complete the assignment. Students could go back and listen to the audio directions as many times as they needed.

Classkick's Whole Class View is a dashboard that allows the teacher to see every student working on the assignment in real time. It's a bit mesmerizing to watch students all working at the same time at their own pace. As students are working on their assignment, I pull up and monitor the Whole Class View. With this view pulled up, I can monitor which students are needing my help, assess and provide feedback on assignments that are completed, award points for assignment completion, and export the assignment data.

I would love to hear how you're using Classkick in your classroom. What are your favorite things about it? Let's share ideas.


Tuesday, August 30, 2016


Class Checklists: Best Resource EVER!

Have you tried using a class checklist in your classroom? If not, you're missing out on the BEST RESOURCE EVER. It is my secret weapon that I use on a daily basis to keep me organized in my classroom.

Want to try one? It's a free resource from my TpT store, Add Some Sparkle.

Here's how you can get started:

  1. Download the Editable Class Checklist from my TpT Store
  2. Choose either the 25 student or 30 student checklist 
  3. Locate the editable sections of the resource by clicking on the blue boxes 
  4. Fill out the left side of your checklist with your classroom information, assignment information (if desired...I usually leave this blank), and your class roster. The form will automatically fill in the right-side of the document for you after you hit the "return/enter" key when you're finished typing.  
  5. Print your checklist. 
Now what? 
Print out a plain, white copy of your checklist and take it to a local printer (like Office Depot) to be made into tear-off pads. You'll need to tell the printer a few printing instructions: print on bright, colored paper, cut in half vertically, bind at the top, and each tear-off pad should have 50 sheets of paper each with a cardboard back.   

If you don't want to spend the money to make into tear-off pads, you can bind the checklist yourself with a small binder clip.

Classroom Organization Heaven 
I've used this resource in my classroom for ten years and I still love it. Here's some tips and tricks on how you can use it in your room. 
  • A teacher or the students themselves can put a checkmark in the "Done" column when they turn their assignment in. I leave a class checklist and a pencil on top of the tray where students turn in assignments and have taught them how to "mark it done" before they turn their assignment into the tray. 
  • There's no need to put graded papers in alphabetical or special number order. I use a class checklist while I grade and use this paper when I input my grades electronically. The students names are in alphabetical order on the checklist and that corresponds to my electronic grade book. I group my checklists by subject and group them with a binder clip to serve as a paper "backup" just incase my electronic grade book crashes (fingers crossed this never happens).   
  • If a parent volunteer or assistant needs to work with students, I give them a checklist. It gives them a quick reference on who the "next" student they need to work with is and it tells me as teacher who has completed the assignment or activity in one glance.  
  • I can't tell you how many times (picture day, fundraiser packet distribution day, district testing day) I needed a quick listing of the first and last names of everyone who was in my class. A class checklist does the trick every time. 
I'd love to hear how you are using my class checklists in your classroom. Send me a tweet @addsparkle88 or follow me on Instagram @addsomesparkle88.


Tuesday, June 28, 2016

Hashtags and Community Building

Hello friends! I've been so inspired by #miss5thswhiteboard on Instagram and how she uses her classroom whiteboard to engage her students and build community that I want to do something similar with my 2nd graders.  

Have you seen some of the incredible work on Instagram? Check it out because it is AMAZING.

It got me thinking about how I could incorporate weekly social media hashtags to "frame" the whiteboard conversations in my classroom. Students would use a dry erase marker to post their response to the question or conversation topic of the day. Here's an example of how I plan to use this tool in my classroom below:

Aside from creating academic connections, I'm also excited about the opportunity to inspire some lively conversations and connections among us as a classroom community.

I compiled some of my favorite weekly social media hashtags for you below:
Click here to download a copy for yourself Social Media Hashtag Freebie.

I'd love to hear from you and how you've used your whiteboard to inspire community building in your classroom. Send me a tweet @addsparkle88 or follow me on Instagram @addsomesparkle88


Wednesday, March 30, 2016

Working on Writing Fluency


Have you ever had a student tell you they were *ready* to edit with the teacher during Writer's Workshop and you read the VERY FIRST sentence of their writing and it doesn't make any sense?

I attended a Smekens Education Writing Workshop led by Courtney Gordon and learned about a unique tool to help students with their writing fluency called "audience on a stick." Now, my students must read their writing piece orally to their audience member when they think their piece is "done." The tool allows students to hear their writing mistakes and fix-up their own writing BEFORE they come to conference with me. (Sing hallelujah)
Some examples of the unique audience members students created: Darth Vader, a Colts football player, Mojo from Class Dojo, and an African Penguin. 
Students used a piece of 8 1/2 x 11 construction paper cut into fourths, art supplies, and a extra-long, jumbo popsicle stick (purchased in the craft section of Walmart) to create a colorful real life or fictional audience member. I explained that we would cut a "bubble" around their animal or person so they didn't need to use the entire space I've given them. I used clear packing tape to affix the audience member to the popsicle stick.

We keep the audience members in a pencil cup next to our Writing Workshop materials. Students can choose to use their own audience member or one their classmate has created. The unique choices of audience on a stick members keeps students engaged with the fluency tool long after it was first introduced.
Clockwise from top: A student self-portrait, Pikachu from Pokemon, fantasy animal lion/cheetah, a pet cat, and our classroom collection of audience on a stick members. 
As a bonus, students can use the "audience on a stick" tool to help them with their reading fluency as well as their writing fluency. It's a win-win situation.

If you get the chance, check out the Smekens Education Website for more great classroom resources from Courtney and her fabulous colleagues.

I'd love to hear how you are using "audience on a stick" in your classroom. It would make my day if you would send me a Tweet @addsparkle88 or tag me in an Instagram pic at addsomesparkle88.


Sunday, February 14, 2016

3 Fabulous Math Games for Fact Fluency

Hi friends! I'm sharing three math fact games perfect for fluency practice that your students are going to LOVE playing. These math fact games allow for differentiation at different levels of math fact mastery so all students can play the same game at a math station, center, or in a small group.


Sequence Num6ers (7+ adult): This game is for 3 players individually or 3 student teams working in partner groups. The object of the game is to score one sequence of 5 chips in a down, across, or diagonal pattern on the gameboard before your opponents. This game is perfect for addition and subtraction math fact practice as the playing cards feature both addition and subtraction number sentences. Colored coded number sentences and corresponding answers on the gameboard help students with their fact fluency. Students who need extra support can play the game with a number line. A few unexpected twists keep game play fun. Two "plus" cards allows a player to place a chip in any open space on the game board allowing players to "block" each other and the two "minus" cards allows you to remove an opponent's chip on the gameboard.


Double Shutter Shut the Super Box (6+ adult): This game is suitable for 1-4 players (you will need to keep score with the multiplayer game). The object of the game is to shut all of the tiles in the box or have the lowest remaining total on the board. The game directions are primarily written for addition but I've modified this game in the classroom and used this game for addition, subtraction, or multiplication fact practice. Students start with all the tiles flipped up. They roll two dice and create as many correct addition, subtraction, or multiplication number sentences and answers as they can. For each correct number sentence and answer, they get to shut the corresponding tile. Players can only shut a tile from the back row if the tile in front has already been shut. When the total points on the remaining tiles is six or fewer, players can choose to throw only one dice.


Four Way Countdown (6+ adult): This game is for 2-4 players. The object of the game is to be the first player to flip up all ten keys (wooden pegs) before your opponents. This game allows students to create addition, subtraction, multiplication, and division number sentences to match their roll of the dice. When students create a correct number sentence and answer, they flip up their key on their side of the gameboard. A few twists keep this game exciting, if you roll a double six and you have to put all of your keys back down. Roll an eleven and you get to choose: have it count for a number one (6 - 5 =1) or choose to put all of your opponent's keys down. (This is by far the most popular choice in my classroom.)


I hope that you'll be *Adding Some Sparkle* to your classroom very soon. I'd love to hear from my fellow teachers. How are you using this games in your classroom? Send me a Tweet @addsparkle88 or send me a picture on IG addsomesparkle88. Until next time friends.


Wednesday, January 13, 2016

Hour of Code was a huge hit!


I never thought that computer coding education could begin as early as elementary school but my students proved to me that they had coding talent when we participated in Hour of Code during Computer Science Education Week in December. What is it? It's a one hour introduction to computer science where students learn the basics of coding by using problem-solving, logic, and creativity.

I created a QR code choice board of coding activities with different themes such as Star Wars, Anna and Elsa, Flappy Bird, and Minecraft from the Hour of Code website. Students used their iPads and a QR code reader app to scan the QR code of the activity they were interested in. Having the QR code choice board definitely helped my primary students work more independently and allowed them the freedom to try many different types of coding activities.

Students were encouraged to work together in small groups to share their discoveries and help each other problem solve. Students were extremely engaged the entire time they spent coding. I loved hearing how they overcame an obstacle or problem and figured out a complex coding step. I found that these coding lessons provided a great opportunity to talk to my class about the importance of having a growth mindset when you're trying something new.
If you haven't tried an Hour of Code activity with your class, it's not too late! The activities I mentioned above stay up year round. Go to the Web site https://hourofcode.com/us to learn how to get started. Happy coding!


Sunday, November 1, 2015

No More Money Egg Drama

In the past, I dreaded teaching counting money because it meant that I had to use those plastic "money eggs" with my math groups. You know what I'm talking about, right? Those plastic Easter eggs that we "saved" from last season and stuffed with a group of coins and stored in an egg carton.

What happened when students used them? Coins fell out of the eggs and got lost so my teacher answer key never matched up with the amount the students counted. The students switched the tops and bottoms of the eggs (yes, even though they were color coded) so that my "numbered" eggs ended up all mixed up. The not-so durable plastic eggs and egg cartons cracked/broke/fell apart and their contents fell all over the floor. What a disaster!

What is a teacher to do? I say get rid of them. I decided to work SMARTER not HARDER. So get out your Popsicle sticks (Jumbo sized preferably) and hot glue gun. Turn your money eggs into money sticks by hot gluing your coins to a Popsicle stick and solve all of your pesky money egg problems.

To easily differentiate and meet the needs of all of your students, vary the placement of the coins on the stick. Green money sticks feature amounts less than $1.00 and coins are arranged largest to smallest amount. Red money sticks feature amounts greater than $1.00 and are arranged randomly for a more real-life type of counting situation.
Another benefit of using money sticks? They are very versatile. Students used the money sticks to compare different amounts of money using the greater than, less than, and equal to symbols. 

We also played the game "kaboom" with money sticks. Without peeking, students drew money sticks out of a container. If the student was able to successfully count the money amount on the stick, they got to keep it. If they were wrong, they put it back into the container. When they drew the "kaboom" stick, they had to put all of their winning sticks back into the container and start over.

I'd love to hear how you are ditching those eggs for money sticks in your classroom. Tweet me @addsparkle88, IG at addsomesparkle88, or connect with me on Facebook at Add Some Sparkle. See you next time friends! 

Sunday, October 18, 2015

Counting Money Pumpkin Patch Craftivity

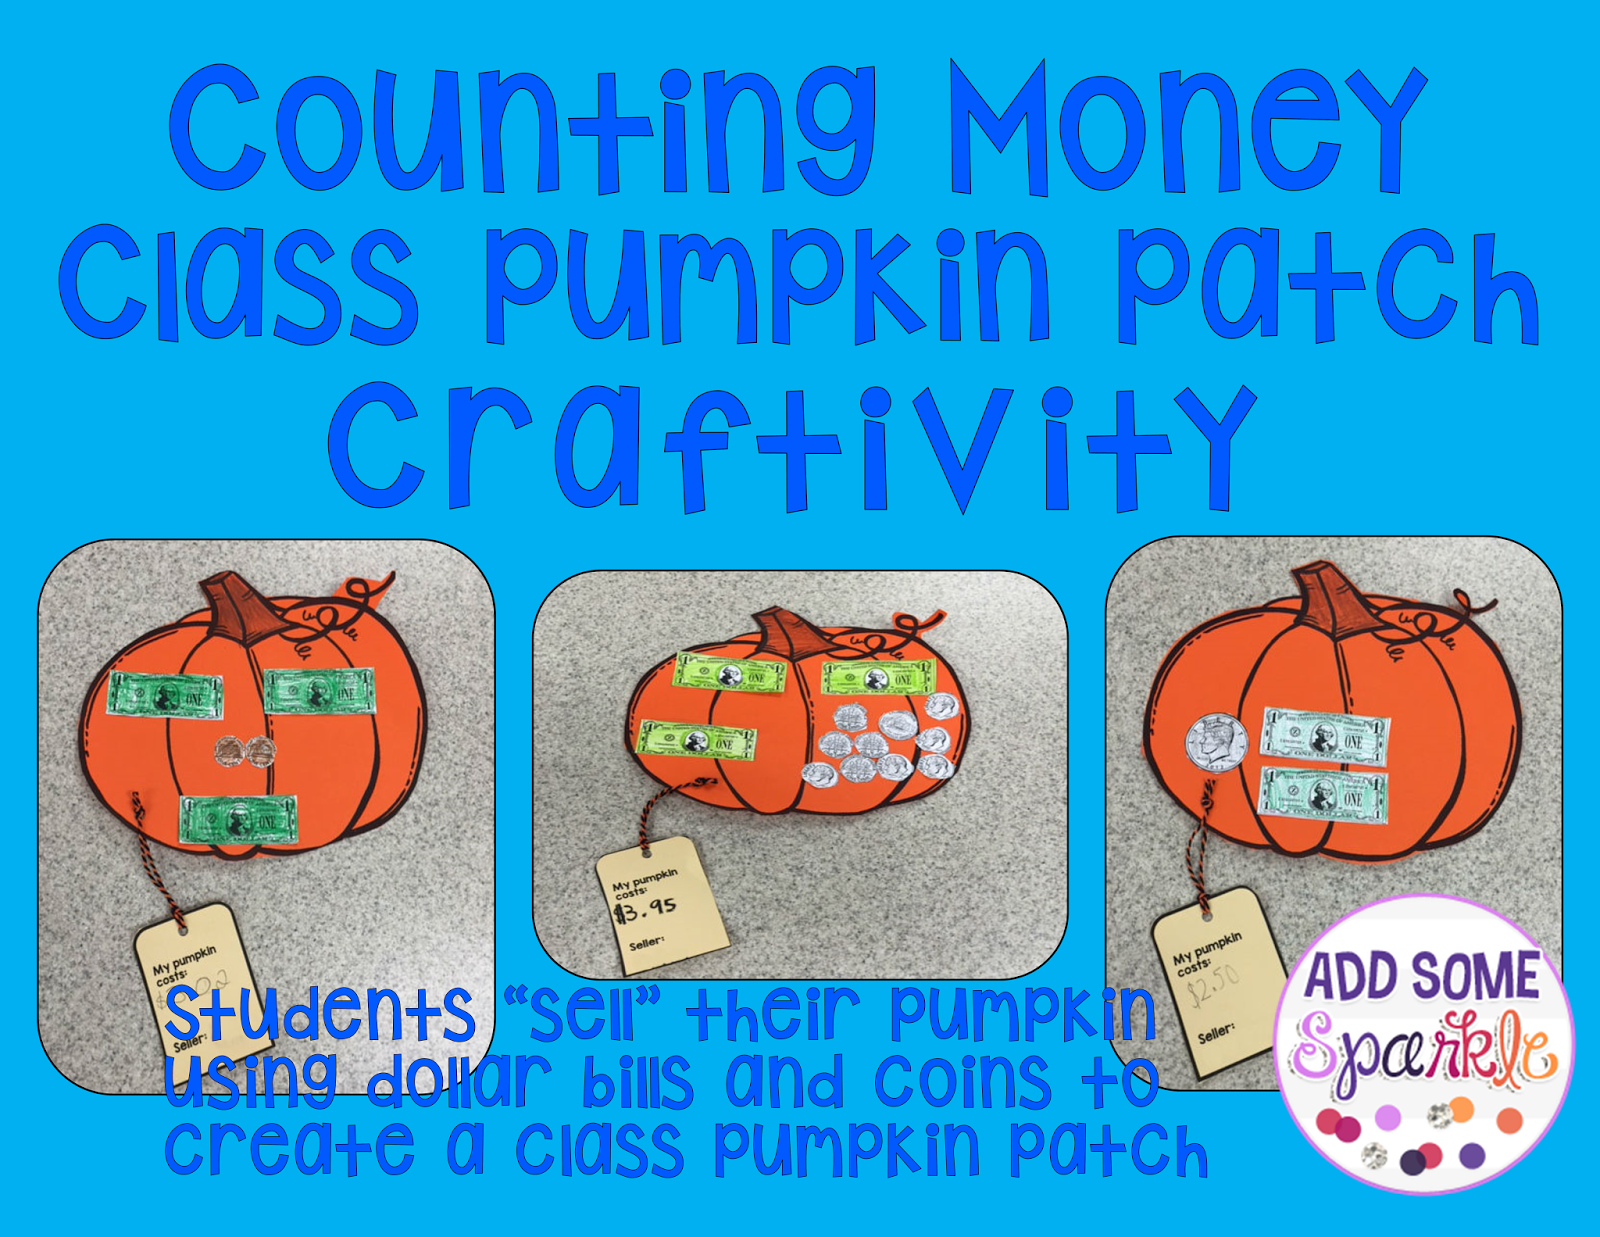
I'm so excited to introduce you to a new product I created to showcase your students counting money skills with a fun craftivity. Students create a pumpkin to "sell" using dollar bills and coins. Each individual student's pumpkin is displayed together to create a class pumpkin patch of pumpkins for sale.


I began the lesson by starting a class discussion about how much students thought pumpkins cost in real life. The students were pretty insightful with their observations and we established a price range of $2.00-$6.00 for a medium sized pumpkin. Next, I showed students some local prices of pumpkins from stores in our area. I let the students decide on how much they wanted to price their pumpkin for with the guidelines that their pumpkin needed to cost more than $1.00 but less than $6.00 and they must use dollar bills and coins. That was all the direction they needed and then they were off to work!

Wow! Don't these pumpkins look great? I'm really happy with how they turned out. The whole craftivity takes about 25-35 minutes to complete and makes a wonderful bulletin board for fall. See you next time friends!


Tuesday, September 1, 2015

A *Super* Hero Classroom Reveal


Hello Friends! I have a *super* hero themed classroom reveal for you. 

I love adding Super Hero artwork and themed items to my boring beige walls. 


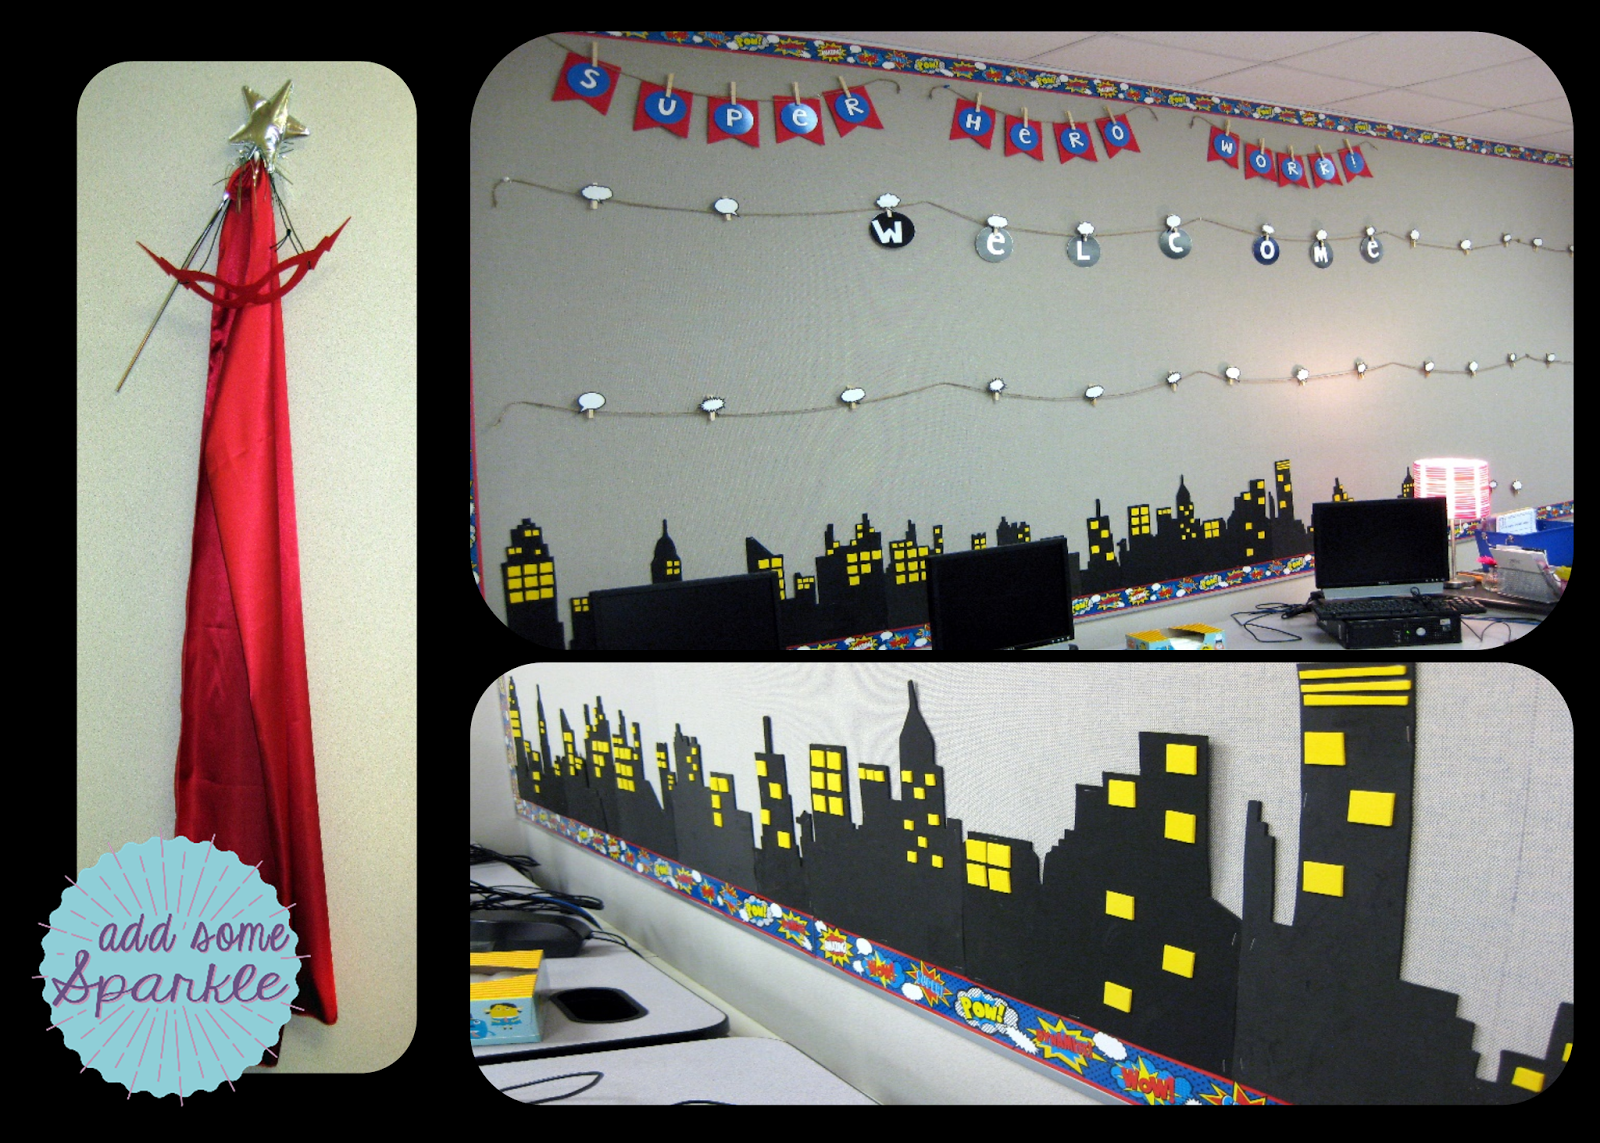
I know what you're thinking...can she actually wear that cape and mask? Yes, I can and I plan to do so later this year. You gotta love dress up days at work, right? Only a teacher could get away with this. I ordered all the art work from Etsy. I found tons of cool stuff there and had to rein myself in a bit before I purchased all of it.  

I decided to take down my Word Wall and replace it with a display space for student work. Student work is attached to the line with thought bubble clothespins. I hot glued a thumb tack on the back of the clothespin to allow me to hang heavier work without me worrying about it falling down 5 minutes later. I'm loving this design and it takes me about 3 minutes to take down and rehang new student work. The best part is that it doesn't require any stapling. #itsthelittlethings I created the "citiscape" out of black foam with yellow foam "windows" tacky glued right on top. It was remarkably easy to do. 

And who doesn't love banners? They are a quick and easy way to spice up a space. 


The Super Hero theme continues with the signage in my classroom. Everything from pocket charts, to the lunch menu, to my student job chart is done in the Super Hero theme in the blue, yellow, and red color scheme.  


I hope that you've enjoyed a sneak peak into my classroom. Many thanks to Ashley Schroeder   and Angie Olson @MrsAOlson for hosting. #2getherwearebetter 


Until next time friends,
 photo Stacey Blog Signature_zpsujslgn3h.png

Sunday, August 2, 2015

Bulletin boards that are really *Super*

Hello Friends! I'm linking up today with some of my favorite Second Grade Teachers, Angie Olson from Lucky Little Learners @MrsAOlson and Ashley Schroeder from Schroeder Shenanigans in 2nd @schroedershenan. As we approach Back-to-School time for many of us, we're talking about bulletin boards on the blog today. 

Ok....confession time. (Deep breath in.....and exhale.) I'm must admit that putting up bulletin boards is not my favorite thing in the world as a teacher. Phew! I just said that sentence really fast. Before you start blowing up my comments section with your disbelief and disagreements, I just want to say that I KNOW that as a Second Grade teacher I should love this opportunity to be crafty but I really don't. Here's what I don't love about it.....for each unique and creative idea that I come up with, I draw a blank with the upcoming new season, theme, unit, etc. It's too much pressure and it stresses me out! 

Well friends....I've decided to do a Super Hero theme this year where the majority of the backgrounds, borders, and decorative trim will stay up all year long. I'm going to be all about working smarter, not harder. However, the student work will vary. It's an idea that's so simple but SO good! Why in the world haven't I thought of this before year 9 of teaching? 

Check it out below and let me know what you think. (Don't you just LOVE this little guy?)


The top picture shows off my classroom bulletin board in the hallway. I have 26 incoming 2nd Graders so I tried to keep as much space available for student work as possible. I'm going to need every inch of space. The blue paper works well for two reasons, it becomes a nice "neutral" color that looks good with a variety of student work posted on it and it looks like the "sky" when I post my Krista Wallden Superhero Kids Clip Art around the board. It's all ready for the first day of school and Deanna Jump's awesome Super Hero Craftivity and Writing Assignment that I found on TpT. The bottom picture shows off the inside wall of my classroom where I'll hang student work on "thought bubble" clothespin clips with their names. To add some durability to the design, I hot glued push pins to the backs of the clothespins.


Here's a close up of the Super Hero Work Wall complete with a night time Cityscape made out of foam to give it some depth. I Googled images of cities and used my overhead projector to trace the images onto large pieces of foam board. I'm really pleased on how well the design turned out since the wall space takes up one entire wall of my classroom.


I think I'm addicted to making banners for my classroom. Here's one that says "Grow" but I also have ones that say "Read" and "Learn" all made from felt.

I've even tried to spruce up my desk area with the Super Hero theme by hanging *my* cape, mask, and magic wand next to artwork that gives my students a glimpse into my personality and favorite things - flip flops and the beach, caffeine (I love all kinds), and Disney. They always think it's cool when I tell them that I worked at Walt Disney World in college so it give us something to talk about right away.

So...what do you think? I must admit that I'm really pleased about how the bulletin boards turned out. Who knows? I might just change my mind about bulletin boards after all. 

Have a great beginning of the school year friends!


 photo Stacey Blog Signature_zpsujslgn3h.png